There aren't many jobs where I haven't needed to go out to location and do a location survey. Worse is when you are given a survey by the Art Director and told to do a Director Drawing of a location that you haven't seen yourself. Sometimes it's good to get out of the office, sometimes you'd rather stay in. I've surveyed in heat waves and rain storms. But someone has to do it and no one can do it better than the Set Designer who will do the drawings.
There are different types of location surveys. At one extreme, you go along with the tech scout and have 15 minutes to measure as much as you can and when you get back to the office you do a rough Director Drawings. Usually no one expects perfection on these. The other extreme is you have help and spend a lot of time getting every detail. You come back and draw an accurate drawing that can be used in making changes to the perfect location to make it more what the director wants or duplicate it on stage. There is a range in between. The third extreme is the above mentioned where the Art Director took 15 minutes during a scout and gives you data that is almost unusable.
Occasionally an Art Director will give you unusable data and expect a perfect drawing. In this case, you have only one option, pray. After that, see who else on the scout might have better data. Locations (the Location Department) often has better photos, sometimes on a private website for which they will give you the password. Usually construction sent two people (don't ask me why the Art Department can't) and they, knowing they might build something there, took good measurements. Often someone can provide you with existing drawings, such as builder drawings for a custom home or track drawings for a track home, facilities for a commercial building, or other drawings to help. Verify these, there have usually been changes since construction. If it's outside, try Google Earth or other sources. Maps can help with irregular shaped areas. If it's a private home, you may have a more difficult time. Remember, the boss is always right and if the boss gave you faulty data, it's still your responsibility to make a good drawing. "Garbage in, garbage out" is no excuse here. Set Designers are hired to work miracles. Art Directors often take photos of the locations, but are often too busy to pass them along and usually take closeups with no point of reference. I had one Art Director who insisted on taking low-res photos because it
made for a smaller database. These were unusable. From a good high-res photo, I can tell which way the door swings by looking for hinges and knobs and stops.
Surveys:
The 30 mile limits is a circle within which, workers drive themselves. Beyond, they are bussed. Don't be surprised if you are asked to drive yourself outside the limit - log you miles and seek mileage reimbursement. You are sent out on an Art Department scout to survey. This is what to expect. Locations gave you the wrong directions, the person you were suppose to meet didn't show, they forgot to get permission to visit and security threatens to arrest you. These are some of the things that have happened to me. One Production Designer often scheduled for me to survey on the other side of town at rush hour and meet the locations representative in 30 minutes and is only telling me now, and I have to be there. I'm sorry but no one in production is going to pay for my speeding ticket and such, so I grab my survey tools which are always ready, run to the car, and drive as quickly within the speed limit and safely as I can so as not to be too late. Always have parking money. Keep a Thomas Guide and GPS handy. There usually isn't time to MapQuest because you have to be across town in 30 minutes and should have left an hour ago, but they just told you.
|
My locations survey bag has all sorts of stuff and weighs about 30 pounds. Some of the items are 100 foot tape, 50 foot tape, 40 foot tape, 35 foot tape, Picket Rod*, a collection of shorter tapes, extra tapes to lend to others on the scout who didn't bring one, cloth tape to measure the circumference of a round column, folding carpenter's rule (with every other section painted black on the back), pens of various colors, pencils and erasers, double head nails, sliding-T bevel gauge, protractor, profile copier, gloves, mask, correction fluid, flashlight, batteries, camera, water, studio molding catalog, clipboard, paper, communications device, and more. Maybe it weighs 35 pounds. I don't like the laser measurers. They have their uses, but I often find in a small area or a small building, I can
|
measure faster with a good 35 foot tape measure. The laser is often an expensive toy and I've seen others adjusting it while I'm measuring. They are no good for inside corners where there is nothing to bounce them off but great for long distances, high ceilings, or measuring across a body of water.
*Keson Pocket-Rod (PR-618). It fits in a case similar to a tape measure, but the entire tape is only about 6 feet long and is completely removed from the case and stood against a wall or surface. Every other foot is black. Place it in a photo for scaling from a photo.
|
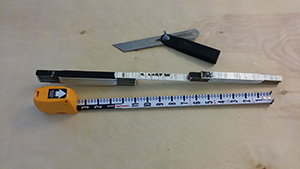
Top to bottom: sliding-'T' bevel gauge, folding ruler with alternating black/white (each color is 6 inches), Keson Pocket-Rod (the rod comes completely out if needed).
|
| |
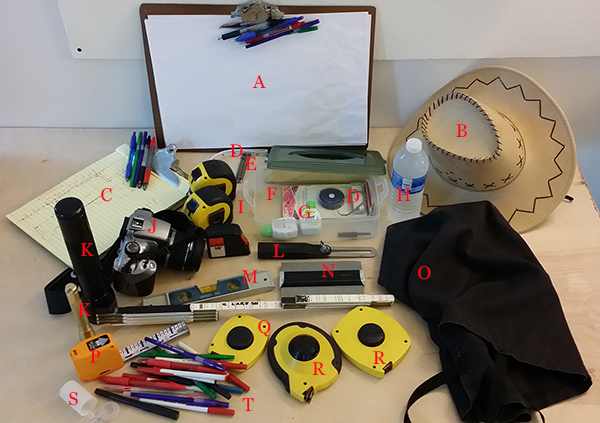
A) 11x17 clipboard; B) Hat for exterior surveying on hot days; C) 8 1/2x11 clipboard; D) Seamstress tape measure; E) 16d double head nails; F) Box for small parts; G) Correction fluid in case you have time to use it; H) Water for drinking in the field and to use to find level; I) Collection of tape measures; J) Camera; K) Flash light; L) Sliding-T bevel gauge; M) Level; N) Profile comb; O) Carrying bag; P) Keson Pocket-Rod; Q) 50 foot tape; R) 100 foot tape; S) Push-pins; T) Collection of pens. There are other tools, laser measure, measuring wheels, protractor, and others, but this is what I use. I also carry an umbrella for sudden rain storms, it's hard to write on wet paper.
|
So you have 15 minutes during a tech scout and no help. First, sketch the room in simple lines which shouldn't take longer than 30 seconds, showing approximate corners and openings. This doesn't have to be perfect, hopefully the numbers will make it work out. I take an overall measurement in three directions - don't forget the ceiling height. I stand in each corner and photograph the opposite corner. If the room is long and narrow, I'll stand at each end and shoot the length as well. If this is all I get, I can come reasonably close and it's good enough for a simple Director Drawing. I take more photos if I have time. Next, I measure all around the perimeter of the space. Don't bother with moldings, just measure the rough door and window openings and corners. Unless you are matching the location or building plugs or walls, the moldings don't usually mater. Don't forget to measure the height of the window sills and heads. You don't need these for a Director Drawing, but Set Decorating might aks for window sizes for window covers. To measure a round column, use a seamstress tape or string to wrap around the column and divide the circumference by pie (3.14) to extract the diameter. Don't get so wrapped up measuring the perimeter that you forget to locate columns and other objects toward the center. Show the door swings, you might fill this in with photos if you forget, but it's better to remember. Add cabinets, counters and other similar constructions. If you need the profile of a molding, that is why you brought your profile copier and studio molding catalog. Press the profile copier against the surface and carefully trace the edge on a piece of paper. When a room has corners that are not square, you can fold paper into the corners and be sure to label them. Or use a sliding-T bevel gauge. It's nice to have help, but I usually don't. After a short time you will
learn how to do this quickly. Note soffits, counters, and exits. Take as many photos as you can. When you get back and can't read your notes, the photos might remind you if it was a door or a window, the column you forgot to measure, weather the window was double hung or casement, the door swings, furniture, and other missed details. A level or water bottle can be used to determine a slope.
When matching a location, detail is more important. Make note of any details (mail box, window box, flower pots, etc.). Check the number of glass pains, the texture of the materials, moldings, hardware, special conditions. Note the outside, across the street, etc so that the backing will match. Photograph the overall door with the story pole in portrait and then photograph the hardware in front and side - including a ruler. Detail may be lost in photographs taken with a flash, make a sketch of detail, include dimensions.
There are two ways to measure more than one space and I've done both. Place each room on a separate piece of paper. This doesn't get cluttered and there is more room for dimensions, notes, and details, but it can get confusing when you get back to the office and start shuffling pages and trying to match doors from different sheets. When possible, I try to get as much as I can on as few sheets as possible. Besides, construction will waste enough trees when the set is changed.
Be organized. If you are on a tech scout, on your way to the next locations, label everything and look it over while the memories are fresh. If something isn't clear, fix it. You will thank yourself when you get back to the office and aren't looking at 20 confused sheets.
I learned this next trick in the training class that all Local 800 Junior Set Designers are required to take before advancing to Senior. Use pens of different colors. In drafting we have time to draw straight lines and use line weights. Location surveys tend to get sloppy as the Tech Scout starts getting back on the van and you are still measuring. I draw the walls and other objects with black ink. Dimensions are red, other lesser objects like furniture in blue, greens are green ink. Notes can be red or another color, maybe purple. When you get back to the office and see a bunch of lines the same color, you get confused if it's a wall or a dimension line, a walkway or the edge of a planting, a column or a chair. But not if they are different colors. Of course all those photos you took help too.
|
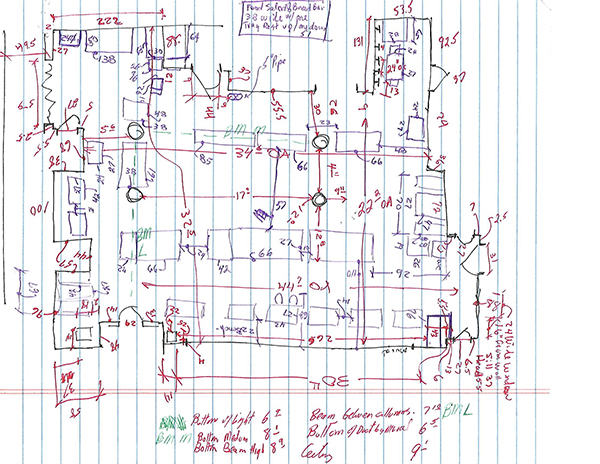
This survey was quick and a little sloppy, but color coding helps clarify things when it's time to start drawings.
|
Triangulation and Large Exterior Spaces:
For large exterior spaces, if I am given warning before the scout (which doesn't often happen), I can print off a Google Earth image and have a starting place. This is where a laser measurer might help, but I've done pretty well with my 100 foot tape. The key is triangles. Pick a starting point and start measuring triangles between all important points, the other end of the wall, corners, walks, trees, posts, fences, whatever. This is where the double head nails come in. Especially when working alone, you can stick the nail in the ground and clip your tape to it. It's better to remove the nails when finished. There are probably still a few nails in the Warner Brother Jungle from when I surveyed it for invasion. In a stage, I might use push-pins for the same purpose. To establish a right angle, use the 3, 4, 5 triangle method. A right angle has multiples of 3 on one side, 4 on the other, and if correct, the hypotenuse is 5. Back in the office, draw the starting line and from the ends, draw circles of the correct diameter, where two circles cross, that locates the third point, another corner or a lamp or something. Use new points to establish the center of new circles. Keep doing this until it all falls into place. It takes a little experience but you can come reasonably close if you are carful. Of course, once you have located the corners of a building in the middle of the field, you measure the rest of the building the same way you would if you were only drawing the building. Then go on to the next building and continue. This could be a short chapter by itself. Again, take as many photos as you have time for.
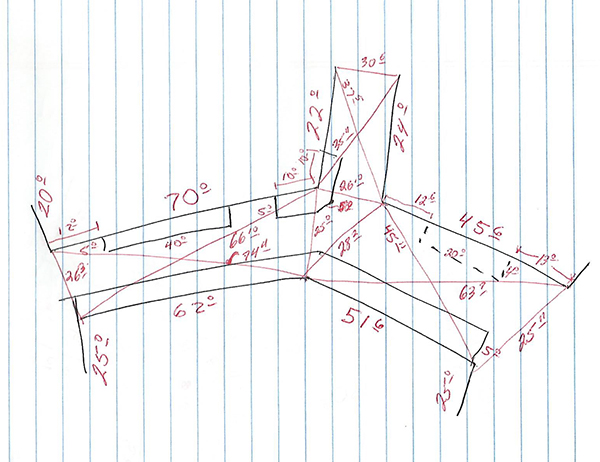
Start with the basic survey, measuring the diagonals.
|
.jpg)
Start by drawing the first line and then locate the ends of the second line.
|
.jpg)
Draw circles to locate the next corner and then use that corner to locate the third side.
|
.jpg)
Two more lines locate the other end of the fourth line.
|
.jpg)
Locate the end of the fifth line.
|
.jpg)
Three more arcs locate the other end of the sixth line. You can do it with only two circles, but the third arc is a double-check.
|
.jpg)
Now you can add everything else in the normal way for the finished product.
|
Another method, especially useful when you can't get access to the property to measure distances, is to use a drawing sheet. Lay the sheet down parallel to a reference line, and to one side, sight down the trianglar architects scale to line up on corners and use the scale to draw the line of sight. Do this for all major features and label the lines so as not to confuse you later. Keep the sheet parallel to the reference and move a known distance to the other side, draw this line in scale on the sheet. Repeat the sighting down the scale and drawing lines and labeling. Where the lines cross that are sighted to the same given object (reason for labels), draw/mark that object. Connect these objects. Use photos to fil in the rest.
Stages:
Surveys include stages. By now most of the stages in Hollywood have been drawn by someone more than once, but there is no central place to get some of them, so I've drawn a few dozen from scratch. A word of warning here, don't ever trust stage drawings without verifying. I've been given stage drawings that were flopped, inaccurate, missing gold rooms or other important equipment or stairs. The only times I've ever had trouble with a spotting plan was when I was unable to verify stage drawing given to me. When time allows, I prefer to measure it myself. This
goes for any location.
Photographs:
Use a 50 mm lens, it is closest to the human eye. Wide angle lenses distort more. When doing a panorama , allow overlap and plan the shots to include reference points, door, edge, tree, etc. Be as square to the object as possible, use a known object for scale, such as a coworker or the Pocket-Rod mentioned above or a folding measuring stick with every other section painted black, or measure and note objects such as doors or heights. Photograph details, intersections, and joinery.
Other:
Colors are usually not the Set Designer's concern. Usually the Art Director and paint foreman will note colors. Sometimes, if the Set Designer is the only one going to a location for some reason, the Set Designer may have to take a fan deck and match colors. I sometimes will find the color I think is correct, and then take a photo. Even if the photo is off, the original and sample will be off together and the sample is labeled. The Set Designer might have to take notes of fabrics, but this isn't often. I have often photographed signs to cover or duplicate. In a commercial building, I might photograph the fire exit emergency drawing as a rough double-check in case my survey is off.
Depending on the location, it may or may not be important to note furniture and dressing. Sometimes all the existing furniture and dressing is removed and the entire location dressed. In this case, you probably don't need to document this. Often, the furnishings and accessories will stay and it's not unusual to add these to the Director Drawings. There usually isn't time to measure all this furniture. In this case, I take lots of photos and only measure items that are unusual. I already have a grand piano drawn in my computer, but one location had a harp, so I measured it.
If it's a large location, and if possible, try to bring help. I find that usually by the end of a PA's first scout, he or she learns which end of the tape measure to hold. It is often three times faster to have someone else hold the other end of the tape. While the Set Designer often doesn't have control of the situation, it is disconcerting to be measuring a large remote location alone. I've often wondered how long it would take for anyone to notice if I didn't come back after suffering some type of accident. But there is usually someone on the availability list to take my place. Sometimes a Set Designer wishes that security had come along. Depending where you are surveying, keep your tools close.
Don't be surprised if you measure the same location several times. Since the Set Designer's job is to follow orders, Art Directors often don't tell the Set Designer what he or she will be measuring and don't think to ask the Set Designer if he or she has already surveyed the location. If this happens, try to remember what you got wrong the last time and measure it all again. Locations sometimes change and it doesn't hurt to verify. Still it would be nice to know before you leave the office so you could print off the previous drawing, but this rarely happens. I once measured the other half of an alley and thus, now have the whole thing. I've resurveyed and drawn in the computer locations I had previously drawn with pencil. Keep the original notes and only distribute copies are needed.
I'm sure I left out a lot, but the key is to get overalls (overall dimensions), take photos, be as neat and organized as you can, and do it quickly. Bring help if possible. While you need to work quickly when you get back to the office, there usually isn't a van waiting to take you to the next location. When possible, survey the location yourself. It's rare that the Art Director measures and photographs what I, as a Set Designer, need.
|
|
Google Earth in the Art Department
|
Part 1, Using Google Earth
First, if you have the free Google Earth, resolution is not good. These are not spy satellite photos. Second trees hide a lot of what is below them. It's hard to accurately map a forest floor. Third, shadows also hide a lot. Many details are lost to shadows. Forth, these are not straight down. As the image radiates from the center, you start seeing the sides of buildings and if the buildings are very tall, the image of the roof does not line up with the actual base. If precision is required, do a traditional ground survey.
|
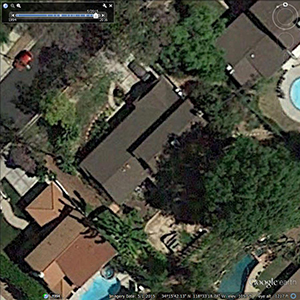
Note how the 60 foot diameter tree hides everything below and the equal size shadow hides even more.
|
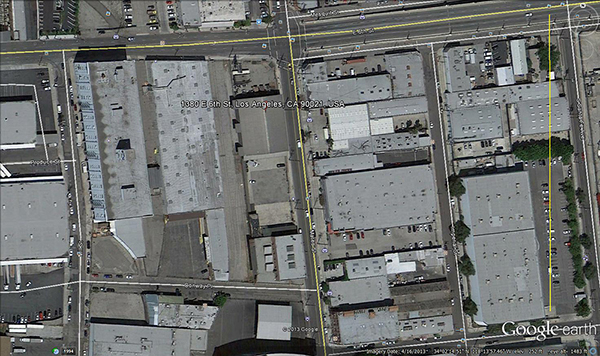
The yellow line at the right is 700 feet long and the file name is "Southwest_Bag700feet". You can also see the west side walls of many of the buildings, showing the horizontal displacement that often makes accurate tracing difficult.
|
Also be prepared for differences in coverage. My house gets updated about once a year, some areas get updated only occasionally. Some remote areas are blank. Many areas don't have street views. I find Los Angeles to be covered well, but not San Diego. If there is recent construction or changes, these may not show.
Since I am mostly a Set Designer and am usually looking at Google Earth to do Director Drawings or spotting plans for construction at the location, I need a degree of precision. If I was able to do a ground survey, this helps determine scale of known measured objects. Often, I'm working only from the Google Earth image.
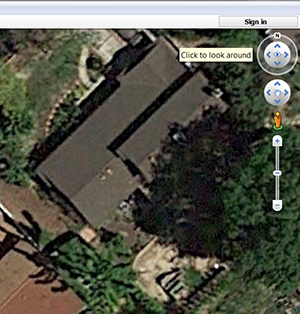
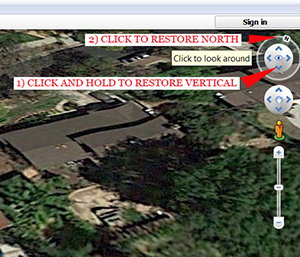
I start by zooming and panning until I’m looking at the subject site and enough of the surrounding for my needs. After you adjust scale in your CAD program and discover that you didn't include enough of the surrounding areas, it's hard to go back and add more. I usually start over at this point. At least for me, as I zoom in, the view shifts to the side so I adjust the angle to be vertical and click the compass to make sure north is at the top. Even if you don't want north at the top, I prefer to save it this way and rotate it in the CAD program.
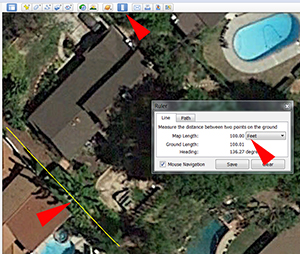
Because I want the drawing to be to scale, I use the ruler tool to draw a line of known length along one edge. Click the ruler icon on the top tool bar to open a dialog box. Click once at one corner, move your cursor and watch the distance displayed and click again at an adjacent corner. I include the resulting yellow line in my saved image and I include the distance as part of the file name (ie. Joes_House500feet).
|
|
The street view is also useful to explore a location that you didn't actually visit. As you look down on your site, drag the little person icon to the adjacent street and pan around. Click further down the street and the viewpoint moves to that spot. Click "Exit Street View" to return to the aerial view.
There are numerous settings to turn street names and various features on and off. You can experiment with these settings. I don't find the 3D view useful for me, I find it's usually too distorted for my use. There are often little squares on the image and if you click these, you get photos and information that someone has added.
Google Earth is free so I find it affordable. Enjoy.
Part 2, Site Plans from Google Earth
I save the image (see part 1) and insert it into my CAD program (I use AutoCAD) on the image layer. I trace the yellow line that I made in Google Earth with the ruler tool and scale this line and the entire image to the distance that I determined earlier. The image is now about full size, but don't expect it to be perfect. I usually find that if I draw a vertical and a horizontal line, both are not to scale unless I adjust the image proportions in Photoshop before bringing in to the CAD program.
At this point, I change layers and trace any desired feature and add what I need. I can output either with or without the image (just my line drawing) or I can fade the image in AutoCAD so that it isn't so dominant. The resulting drawing is usually close enough to add picture vehicles, set dressing, and new constructions with acceptable accuracy.
I've used this to draw single small lots and areas of several blocks. If I need to show this in multiple scales, I do this in two ways. I may save the image in Google Earth and zoom in and save another image, or sometimes I do my zooming in AutoCAD from the only wide image. The difference is resolution. Google Earth isn't fine spy satellite quality photos, but if you need a wide area and a close up, the resolution will be better if you save, zoom in, and save again. There is a point where zooming any more just makes a grainy image.
As a Set Designer, I've used these images to produce a variety of drawings. For Spotting Plans, I've shown placement of tents, picture vehicles, crew trucks, arrows showing entrances, key features. For construction, I might show barricade placement, new walls, added greens, picture vehicles, green screens. For Set Dressing, I might show dumpsters, crates, pallets, debris, added fences. And of course, I can add text and dimensions to these drawings.
So download a free copy of Google Earth and experiment.
|
Lesson 5 - Unusually Shaped Sets
As you progress in your career, you will probably design more hospitals, police stations, and homes than you can count. Occasionally you will design something unusual, like the Bridge of a ship like the one I designed for The Last Ship or Tunnels like those we built for Teen Wolf.
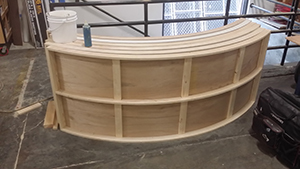
A prop maker friend use to tell me, "Stations and stringers" by which stations are studs in a flat wall, curved beams in a fuselage or hull, or in this case, the rings of the tunnel, stringers are the horizontal parts that hold the stations in place. Almost everything can be broken down this way.
Teen Wolf liked to shoot in dark tunnels and the like, so after moving the entire show to a new facility, we designed a new "Tunnels" set. We reused a few pieces from the old "Tunnels" set, but it was mostly new construction and for interest, we included a round tunnel. The round part of the tunnel wasn't that hard, the interesting areas were the transitions between the round and rectangular tunnels and rectangular doors. I worked everything out in 2D AutoCAD, but to make everyone happy, I modeled sections of the transitions in 3D. We built the round tunnel in modules as much as possible. The first thing you need to consider when deciding to build anything curved, is it will take more material. The carpenters spent days cutting arcs from rectangular sheets of M.D.F. and plywood leaving many crescent shaped pieces of scrap. Each section of tunnel required 5 arcs, two ends that would extend into the tunnel and be seen as flanges, and three on the outside that would fit between the flanges to hold the lauan the same way that straight studs usually do. The tunnel was made of successive rings, each four feet long and consisting of three sections around (1 top and 2 sides).
|
images here...
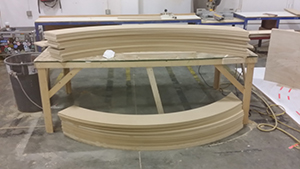
Cutting arcs.
|

The bottom sections had a wide bottom plate.
|
Assembling the sections. These are tops.
|
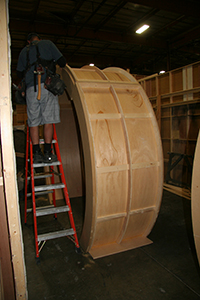
Assembling a ring.
|

The outside of the tunnel showing the framing.
|
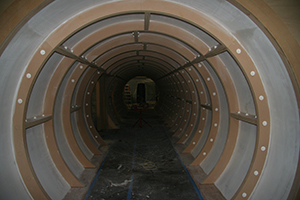
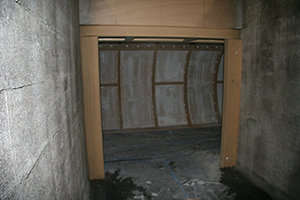
The inside of the tunnel showing the flanges.
|
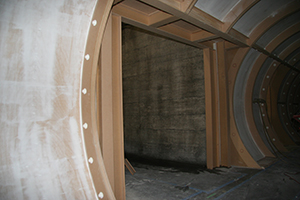
One of the transition sections.
|
The other side of the same transition.
|
Of course, there were extra pieces for looks and buckets of resin cast bolt heads and nuts. Then we painted everything and aged heavily. There were grates in the ceilings for lighting and possibly a camera port. Set Decoration added hundreds of feet of piping and added lights every four feet.
All this is a little more work than a police station wall.
|
|
| |
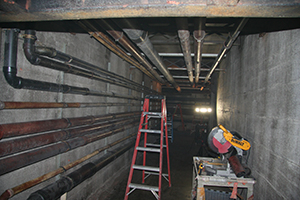
Installing the piping. In this case, we gave Set Decoration a plan, but they adjusted as they went, and I returned later to match the drawings to the final to document the changes.
|

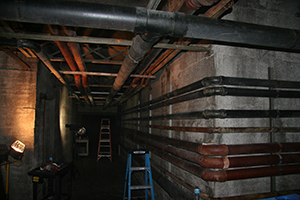
Piping above.
|
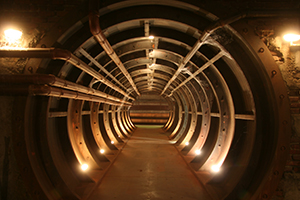
Finished tunnel.
|
|
This page is slowly being built. Check back from time to time to see if I've had time to add anything.
|

|
Copyright © 2000 - 2023, Kenneth A. Larson. All Rights Reserved.
Website content including photographic and graphic images may not be redistributed for use on another website.
|

|
This page last updated: Tuesday, 02-Nov-2021 21:39:01 CDT
|